BEHIND THE LENS - MAJESTIC MATTERHORN
The Behind the Lens series provides a quick glimpse at the emotional and technical considerations behind some of the pictures within our Limited Edition portfolio. This article covers the Majestic Matterhorn Print which forms part of the Switzerland collection.
Introducing the King
There are certain countries which naturally entice landscape photographers onto their shores – New Zealand, USA and Scotland quickly spring to mind. However, it is Switzerland that manages to condense the widest gamut of breathtaking scenery into the smallest of areas. From mighty mountains to fecund alpine plains, it’s quite dizzying to think that the country occupies a total land area equal to that of New Jersey.
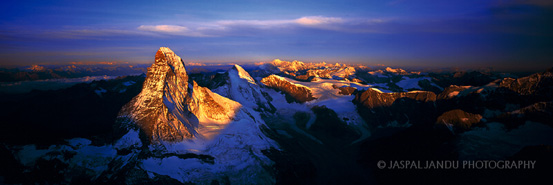
I have been to Switzerland many times over the years and if there is one singular reason for this then it is the Matterhorn. Having photographed the classic conical-shaped peak from more angles than I care to remember, I finally attempted to capture its true essence and grandeur via the panoramic format which I work with…
Composition and Timing
The Matterhorn is 4,478 metres (14,693 feet) high and stands proud amongst a fraternity of other, larger peaks in the Alps. Having viewed the mountain from many angles on the ‘ground’ (bear in mind that it’s fairly easy to take a cable car upto Schawrzee on the base of the mountain at 2,583m), I felt an aerial shot was going to be the best way to capture its glorious isolation.
Firstly, I needed a good map of the area. I would advise against saving money here – a good map can shave hours off the total ‘scouting time’ required in each country or area. Apart from the obvious geographical and topological data, the most important elements to note on any map are the scale and orientation. (I rely on Stanford’s bookshop in London for anything map-related.)
Having quickly worked out that the four sides of the Matterhorn naturally face the four points of the compass, it was fairly easy to determine that a sunrise shot would have to look predominately towards the East face of the mountain. I also wanted the peak of the mountain to puncture the horizon (to emphasise its dominance) and, therefore, roughly estimated that an altitude of around 3,500m-4,000m would allow me to shoot slightly upwards towards its peak.
Having noted both location and altitude, I now needed to wait for the correct weather. After three days of rain (and a mild onset of personal depression), the weather forecasts pointed towards a ridge of high pressure moving into the area. This was important. High pressure systems are generally associated with clear air [see article] and this would allow me to shoot unobstructed onto the mountain with, hopefully, a scattering of clouds in the background.
Flying High
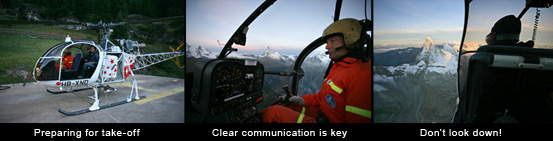
Chartering helicopter flights can be one of the most rewarding experiences around. Small aeroplanes maybe fun but nothing can beat the thrill of sitting in the dome of a helicopter as it manoeuvres through precipitous valley sides.
Our chosen charter company in this instance was Air Zermatt which is based in the town of the same name. It is important to communicate your aims and intentions to the company as clearly as possible. Not only are you paying a considerable sum for the experience but you cannot assume that the pilot shares your photographic vision. Some small pointers which may help you include:
- Safety First. It goes without saying the safety of you and your crew is of paramount importance. Strap yourself in securely through either the seatbelts or a harness (if one is available). Be extra careful of all your camera gear and accessories – an errant roll of film or filter will want to fly straight into the tail rotor of a helicopter if allowed.
- Go over the terrain. In this case I clearly instructed the pilot to a view of the East face within a given altitude range. The company may have set routes and tours for, say, 30 minutes but ask politely if they can change the schedule to suit you and your needs.
- Remove the door. Most helicopters have access slots in the windows or can have their windows/doors removed entirely. It is absolutely vital you ask for either of these options as both the thickness and the curvature of the Perspex dome will destroy the sharpness and contrast of the light entering your camera.
- Dress appropriately. The old aeronautical guide allows for a drop of 2°C per 1000 feet (10°C per 1000m). On this particular morning it was absolutely freezing by the time we began to hover at 3000m and my hands began to loose movement fairly quickly. Wear a thermal base layer and a thick pair of gloves (I have the finger tops cut off mine) for warmth. I sometimes also carry a chemical heat pack which can provide for a few moments of heat when you need it.
Let’s get technical
There are many books on aerial photography and I do not attempt to describe here the fullness of this subject (I suggest you go onto your favourite Search engine and start exploring).
For me, the main problem of taking to the skies is losing the ability to set up a tripod! Thus, the first thing to do is select a wide aperture in order to allow lots of light through the ‘hole’ in lens diaphragm. Once set at either f/5.6 or f/8, I normally tape the focus ring of the Schneider lens at the desired location. Because the aperture controls the depth of field of the image, most landscape photographers will ‘stop down’ the lens to f/18 or f/22 (or higher) to achieve total front-to-back sharpness. However, because trees and rocks don’t normally present themselves in mid-air, one can open up the lens in flight with little regard for foreground objects.
A wide open lens also allows for a faster shutter speed. The old photographer’s rule is not to shoot handheld below 1/60 of a second (the intrinsic vibration of the helicopter may require you to shoot even faster when in-flight). It is also important not to lean on anything within the cabin which may introduce further shake to your image. After some trial and error, I now attach my camera to a small, unextended tripod and then hold the legs of the tripod with my stronger right hand. I attach a cable release to the camera and release the trigger with my left hand. See what works for you by experimenting on a skateboard in your back yard…
Given I was using the new Fuji Velvia (rated at ISO100), my light metre gave me a shutter speed reading of 1/30s based on a mid-tone in the sky. Damn. Although I tried some exposures at this speed, I ended up taking most of the shots at 1/60s and 1/125s. The film was then ‘pushed a stop’ by the processing lab to correct for the deliberate under-exposure.
[As part of the fall-back plan, I also had a Canon 1Ds mkII camera with me and found it laughably easy to change the ISO ratings up to 1600 at a touch of a button. If you’ve ever struggled with film you’ll know how great this feature is.]
I tend not to use filters when shooting from the air. Although a bright, sunny day may call and allow for a UV filter to cut through the haze, there is simply too much light loss with filters to make them worthwhile (this applies equally to the centre filter required for the Linhof 617 panoramic camera).
Concluding Thoughts
As the sun rose it created the most spectacular lighting show I could have wished for. Simply awe-inspiring. Did I get the shot? I wasn’t 100% sure (you never are) but I knew I had witnessed a very special moment. The long trip home and viewing the final image on the lightbox touched at a very open and raw nerve of adventure within me.
After having gone through all this effort, I am still gob-smacked by the way Mother Nature has presented this scene to us all. The majesty, the light, the clouds - they all contribute to the incredible impact which the final print delivers when presented in the right light.
Links & Comments
Majestic Matterhorn Limited Edition Print
Matterhorn on Wikipedia
Matterhorn
on SummitPost
Email your comments